
-
Faulkes Telescope Project Privacy Policy
Obtaining Images of Comet 67P
Obtaining Images of Comet 67P/Churyumov-Gerasimenko: By Tony Angel and Helen Usher
Background
The European Space Agency’s Rosetta mission made Comet 67P/Churyumov-Gerisamenko one of the most famous comets. The mission orbited the comet for over 2 years with the Philae lander the first spacecraft to land on a comet. The mission finished data collection on 30 September 2016, but the analysis of that data continues. Even though we have already learnt a lot about the comet from close-up study, comets are dynamic bodies and so continued monitoring from Earth is still important to see the comet’s evolution.
The comet takes just under 6.5 years to make a full orbit of the Sun. It is most active and brightest when it is closest to the sun (called perihelion). The comet is currently travelling towards the Sun, and the Earth, and will reach perihelion at the start of November 2021. Professional and amateur astronomers across the world are eagerly waiting to observe the comet again.
Comet Chasers
The Faulkes Telescope Project is also planning to engage schools in making observations and analysing data to monitor changes in the comet’s position, brightness, size and shape. This will help professional and amateur researchers. In preparation we are working with comet researchers (including Helen Usher, who is studying 67P as part of her PhD) and experienced observers, including Tony Angel and Richard Miles (British Astronomical Association) who were part of the ground-based campaign set up in support of the Rosetta mission in 2015-2016.
Here Tony tells us more about the observations he has recently made, and how he has analysed and presented them. Tony will be available to help schools take their own images and do similar analysis. We hope that as the comet gets closer this will be easier, and we hope the comet will show more detail!
Tony’s Tale
After hearing that 67P had been recovered I made a request for an observation. To me, it is like an old friend returning as I had taken quite a few images of it when it visited us last time.
I thought that I would have a better chance of an observation if I went for one of the smaller telescopes – a 0.4 metre one. The request for 8 x 3-minute observations locked on the comet, using a clear filter.
Why such long exposures? The comet is still very faint and so lots of light needed to be collected.
Why not just one image of 24 minutes? Three reasons…
- If the comet passed too close to a background or foreground star, the overflowing photons (light) from the star might hide the comet
- Sometimes with automatic observing, the first image may start before the telescope has finished aligning (this happened in this case and only 7 images were usable)
- It might have been possible to make a short animation of the comet (in this case it was not possible as the comet was too faint and only really visible when the images were stacked on top of each other using Astrometrica)
Why use a clear filter?
When I first image an object I tend to use a clear filter, especially if the object is very dim. I want to collect as much light as possible and see how it comes out with the selected settings, and the clear filter lets the most light through. I can then select an appropriate (narrower) filter and modify, if necessary, the other settings. In this case, if I had used say an r (red) filter, I believe that with the settings I used, I would not have captured the comet.
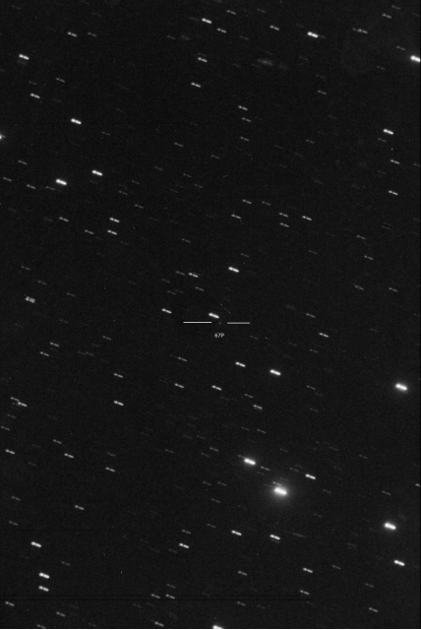
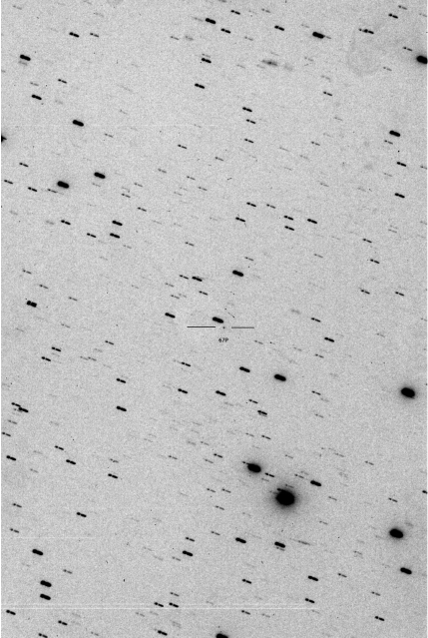
The Images
The image on the left is a positive image. I have rotated the image so that North is at the top. The comet is quite difficult to make out, so I have highlighted it with two lines on either side of it. The image on the right is a negative image. Here, the comet is more obvious and illustrates why most astronomers prefer to work with Negatives rather than Positives. You can see how the comet is seen as a dot, while the stars are lines. This is because I set the telescope to follow the comet and it moves at a different speed to how the stars move across the sky (due to Earth’s rotation).
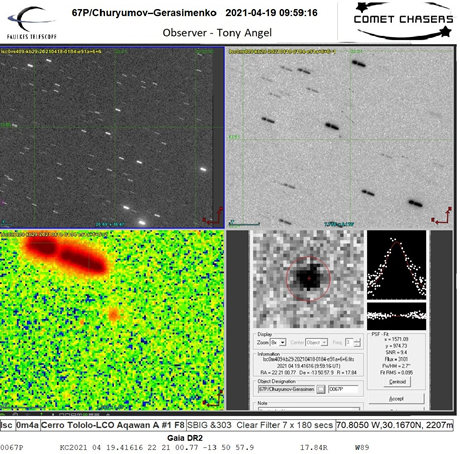
Composite using Aladin
Aladin is one of a number of professional tools that are freely available to both professionals and amateurs. It quite a few nice features including displaying the scale of the image, RA & Dec lines and North indicators. If the comet had a tail or a decent sized coma, I could have used tools to measure them.
The first box shows a slightly zoomed in Positive image. The second shows a more zoomed in Negative image. The third box shows a false colour image, which often reveals more detail.
The fourth box shows the information box produced by Astrometric, showing the date and time of the observation, the RA and Dec (position) of the comet and its magnitude.
Aladin has options for the user to choose how to display data.
I use Windows Paint to add a Header and Footer. The Footer contains other information not included in the image, such as the Name of the Observatory, the Telescope, CCD and filters used. The Latitude and Longitude of the Observatory, in this case – The lsc, 0m4a telescope at Cerro Tololo-LCO.
Finally, a text line generated by Astrometrica contains all the information required that can be sent to the MPC (Minor Planet Center), which includes the comet’s position and its measured brightness. This information is used to help determine the comet’s orbit and activity.
© Faulkes Telescope Project